Back to MaintenanceDirect Main Menu
Automatic Routing
Location based approval routing automatically routes a work order based on its assigned location. Most commonly, it may go to a Site Administrator (department head, principal, etc.) for approval and then, once approved, sent to the maintenance department.
Craft based routing automatically routes a work order based on the selected craft. Most commonly, the work order will be automatically assigned to the craftsman responsible for the defined craft. (Example: Plumbing craft work orders would be assigned directly to the plumber.)
How to Set Up Location Based Approval Routing
Watch the Video Tutorial:

- Click on the Account Setup tab.
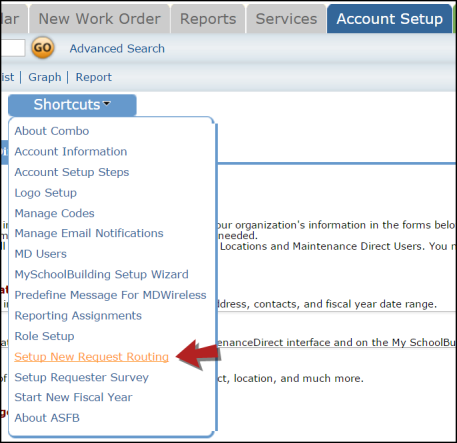
- Click on Setup WO Status Routes, or hover your mouse over the Shortcuts menu and click Setup New Request Routing.
- Under the Add New section, choose the name of the location in the Location drop down box.
- Under When Approved By - Route/Assign To Next, leave the top drop down box as "No One". In the bottom box, choose the name of the person responsible for the approval of the work order for this location.
- Click the Add New button to save. This route now moves up to the list of routes at the top of the page. *Note: In the example pictured below, this route instructs the system: Anytime a new work order is submitted for EB High School, send the work order directly to Jane Doe for approval.

- Go back to the empty route in the Add New section and select the location again in the Location drop down box.
- Under When Approved By - Route/Assign To Next, select the name of the first person in the approval process in the top box. In the bottom box, choose the name of the person whom the work order should be sent to after the first approval.
- If this is the final route and the work will be performed by the user listed in the Assign To Next field, check the box to Stop Routing.
- Click the Add New button to save. *Note: In the example pictured below, this route instructs the system: Once a work order for EB High School has been approved by Jane Doe, send it to Robert Smith.

How to Set Up Craft Based Routing
Watch the Video Tutorial:

- Click on the Account Setup tab.
- Click on Setup New Request Routing.
- Under the Add New section, choose the craft from the Craft drop down box.
- Under When Approved By - Route/Assign To Next, leave the top drop down box as "No One". In the bottom box, choose the name of the user responsible for the selected craft.
- If this is the final route and the work will be performed by the user listed in the Assign To Next field, check the box to Stop Routing.
- Click the Add New button to save. *Note: In the example pictured below, this route instructs the system: Anytime a work order is submitted for the craft of Custodial, assign the work order directly to John Doe.

How to Edit or Delete Routes
- To edit a route, click the Edit button next to the route you would like to change.
- The route will move to the Edit section below the route list. Use the drop downs to make your changes.
- Click Save to update the route.
- To delete a route, click the red x (
 ) to the right of the route.
